1. Appropriate packages and conversion techniques are used to achieve an integrated outcome
2. Data is imported/exported to produce required outcome
3. Data is saved and re-accessed without loss of data
1. Help is accessed through online help and manuals
2. Internal organisation client documentation is obtained and used
3. Glossary
2. Saving documents in different file formats
3. File compression
4. Extracting files from an archive
5. Creating an archive
6. File formats
Please note that the activities and exercises are mostly based around using the Microsoft® family of products, including Windows XP and Office XP. However the ideas and concepts can be used in most other current computer applications.
Tip: For the following activity, if you cannot see the file extension in Windows Explorer, use the


• For this exercise, simply type your first and last name into the document.
• Select
 • Close the Microsoft Word program.
• Open the Windows Explorer program and navigate to the ‘My Documents’ folder on your computer. The ex_open.doc document should have the Microsoft Word Icon attached to it.
• Double click the document and notice how it opens the Microsoft Word program and also ex_open.doc at the same time.
Please note that there is no suggested answer for this exercise.
• Select the
• Name the document ‘change1.doc’.
• Click the small down area beside the input box for ‘Save File as Type’.
• Note the different formats available. The number of formats and the types will be dependent on the version of Word that you are using and the filters installed on your computer.
• Find and select the file type .wps.
 • This will save the file as a Microsoft Works document. Note in the figure above how there are two entries for *.wps. These are both Microsoft Works documents but they are different versions.
• Once you have saved the document, open Windows Explorer and navigate to where you saved the ‘change1’ document. If you have Microsoft Works installed on your computer, then the document will have the Works icon attached to it. If you do not have the program the icon will be a generic one.
• If you now double click the icon it will open the document within Works (if you have it installed).
• OR if Microsoft Works is not installed, you will be asked what application you would like to open the file with. See the figure at right. (The exact message and shape of the box may differ depending on your version of Windows.) Click the

• Add some formatting to your name. (For example, make it bold and coloured.)
• Select the
• Change the
 • After you have saved it, use Windows Explorer and navigate to where you saved your document. Note that if you saved it in the same folder as the last exercise, you will have two files in the folder with the same name. This is allowable in this instance because the two files have different extensions.
• Double click the text document. (Identify it by its icon). It should open your default text editor, (probably Windows Notepad) and also the document. Note that the formatting you applied within Word, (making your name bold etc), has been removed by saving as text.
• However, if the application type that you want to save to is not in the small down area beside the input box for ‘Save as Type’, then you can only save the file as a delimited text file. A delimited file is a pure text file that has an extra character, (a space, a comma, a tab etc) between the different entries in the file to distinguish each entry from the next. Once the file is saved in this format, there would generally be an import routine in the other application, to import a text delimited file.
• Save the file to your computer and open it with Microsoft Excel.
• Select
• Change the 'Files of Type' to ‘Text (Tab Delimited) (*.txt)’. Leave the same name (home_budget).
• When saving the file you may get a warning message about formatting problems. Click OK (or yes) if this happens. This simply warns you that if you save as a text document you will lose some formatting features in the document.Use Windows Notepad and open the home_budget.txt file.
• Note how the data is the same as the spreadsheet, with each cell and column entry delimited (separated) by extra spaces. The extra spaces are the tab entries, (the same as typing and pressing the TAB key on the keyboard).

Tip: This technique is very useful for importing/exporting data from very old versions of different databases. Most application programs can read delimited files, so once the text is imported, it is only a matter of reapplying the lost formatting.
Go to activity
Extracting files from an archive
• There are various ways that you can add or extract files from an archive. This activity will walk you through the most common method.
• Before you begin, download the zip_activity.zip (Zip file) file to your computer and store it in the My Documents folder. Note that the size of the zip file is approximately 3Kb (3000 bytes).
• Depending on the task, some icons will be greyed out.
• Click the ‘Open’ icon and navigate to where you saved the zip_activity.zip file. (My Documents)
 • In this archive, there are two compressed files - a text Document and a Word Document.
• Note the Microsoft Word Document. If you view the right of the Winzip Screen, you will notice that the original document size was 19968 bytes. The compressed size is just 1767 bytes.
 • To extract the files from the archive, click the ‘Extract’ icon. You will be prompted by a screen that asks you where you want to extract the files to. Ensure that the ‘Extract to’ input box shows the My Documents folder. You can either type in the location or use the ‘Folders/Drives’ box and navigate to where you want to extract them to.
• Ensure that the ‘All files’ Radio box is selected. If you select a file/s within the archive window, the ‘Selected Files’ button will be activated and only those files selected will be extracted. (Note that there are some other options available in here). For our purposes we can leave these at the default. You should, however, read the Help files and explore the other options as well.
• Click the
• Check to see if the two documents are in the My Documents folder. To open them, simply double click on them.
• Close the WinZip program.
• Click the ‘New’ Icon.
• You will be asked for a name for your archive. For this exercise, call it ‘My_Zip’. Type this into the ‘File Name’ box, ensure that the ‘Save In’ option shows the My Documents folders and click OK.
• You will then be prompted to select the files that you want to add to your archive.
• Navigate to the My Documents folder and select the two files extracted from the last exercise.

• Tip: To select multiple files, hold down the
• Once the files are selected, click the ‘Add’ button. The archive will be created.
• Close the WinZip program and check the contents of the My Documents folder for the zip file called My_zip.zip. In this archive will be the two files you selected in the activity.
• To add files to an existing archive, simply drag and drop them onto the archive. If you have set a password on the archive, the added files are not password protected.
• To extract files from an archive, you can drag and drop them from the archive into any folder.
• If you double click on a file/document within an existing archive, the file will open with the associated program.
• By default, WinZip adds a shortcut to the right click menu in Windows Explorer. If you select a file(s) and right click the mouse within Windows Explorer, you can create, add, or create and email a zip file.
• Normally, to be able to extract files from an archive, a user must have a copy of WinZip on their computer. However, you can create an ‘executable’ archive. The files of an executable archive can be extracted in Windows, without WinZip.

• WinZip also allows you to span an archive across multiple floppy disks, which is useful if you have an archive that is bigger than 1.44 MB. When you create an archive, specify that you want to save it on the A: drive (floppy disk) and an option to span disks becomes available.

Exercise 3
Activity Completed
Create an archive with multiple files. ?
Extract one file from an archive. ?
Extract multiple files from an archive. ?
Use ‘Drag and drop’ to add a file to an archive. ?
Use ‘Drag and drop’ to add multiple files to an archive. ?
Use ‘Drag and drop’ to extract a file from an archive. ?
Use ‘Drag and drop’ to extract multiple files from an archive. ?
Password protect an archive. ?
Extract files from a ‘Password Protected’ Archive. ?
Use a right mouse click within Windows Explorer to create an archive. ?
Use the WinZip wizard. ?
Create a self extracting archive. Hint: Use the ‘Actions – Make.Exe’ menu option). ?
Create an archive that will recreate the folder structure when being extracted. ?
Note, there is no answer to this exercise. Complete each task within the exercise and remember to use the Help file if needed.
.gif Graphic Interchange File – A compressed format. Commonly used for web pages because of its size. Creates images in 8 bit colour and is used for animation and transparency.
.jpg or .jpeg Joint Photographic Experts Group – Also used extensively on web pages. It is a compressed format mainly used for photographs because at a high compression rate, very little colour is lost. Uses 24 bit colour.
.png Portable Network Graphic – A newer file format for use on web pages. It is of better quality than .jpg and uses a better compression technique. Its main drawback is that older web browsers do not support and cannot display the format.
.tif or .tiff Tagged Image File Format – Used for scanning pictures. Also compatible on both the Windows and Macintosh computer platforms.
.pdf Portable Document Format – A file format for documents that can be read and created on different operating system platforms. Can contain text, images, formatting, colour etc. It is very popular for document distribution across the world wide web, where users download documents to their computers on different operating system platforms such as Apple, Unix, and Windows. The contents are read using the free Adobe® Acrobat program. They are highly compressed during creation but are still generally very large.
.csv Comma Separated Values – A text file in which entries in the value are separated by a comma. When exporting data from a table in a database, the individual field values can be saved in a CSV text file, with each value separated by a comma. This text file can then be exported into a spreadsheet with each entry going into a separate cell within the spreadsheet. You could also use the same technique to export data from a spreadsheet to a database table.
.dif Data Interchange File – A file similar to a CSV file in that the data is oriented towards being stored in columns and rows for import/export to spreadsheets and databases. It also contains extra information to allow easy import and export.
.rtf Rich Text Format – This is a file format where the contents of a document can be saved with formatting, (bold, underline, colour etc) and be reopened by just about any word processor and the formatting in the document will be retained. For example, a document saved with WordPerfect as an .rtf file can be opened by the Word program on an Apple Macintosh and the original formatting of the document will be retained.
2. Cutting and pasting data between applications
3. OLE – Object linking and embedding
4. Linked objects
5. Embedded objects

• Once Notepad is open, type your name into the untitled document.
• Highlight your name by dragging the mouse pointer across it while holding down the right mouse button. Your name will be highlighted and have a dark grey background around it.
• From the

• Either way, the text can now be copied to the Windows clipboard and pasted into other applications. A word of warning: anything that you copy to the clipboard will replace any previous data copied there.
• Close the Notepad program. For this activity, do not save the document.
• Open the Microsoft Word Program.
• Once the Program is open, select the
The above activity was a simple exercise in copying data from one application to another using the clipboard. You can also copy data from a spreadsheet to a word processor document and retain the table features of the data.
• Open the spreadsheet in Excel. The document is a simple home budget that has some figures and uses spreadsheet formulas to calculate various figures.
• Highlight the range of cells from A1:E17. To do this click in cell A1, hold down the Left Mouse Button and drag down to cell E17.

• From the
• Leave Excel open.
• Open the Microsoft Word program.
• Select the
• If you cannot see the gridlines for the rows and columns, select the ------ menu and the
• Note that when the data has been pasted, the formatting has been pasted as well. For example, you should see the green background colour of the heading, the bold attributes, and that the total figure for February is in red.
• Also notice that the total figures are now actual figures and not formulas as they were in the spreadsheet.
Exercise 1
The exercise and activity completed above can also be completed in reverse - you can copy and paste a table from Word to Excel. When the data is pasted, the values in the table columns and rows are kept the same as in the cells within Excel.
• Open the document and click anywhere inside the ‘Rabbit’ data table. This should select the table that holds the data. Depending on the version of Word you are using, there will be a box with a cross in the top left of the table area. Click on the cross or drag across the table while holding the right mouse button. This will select the data within the table.

• Use the techniques learned before and copy the table to the Windows clipboard.
• Open the Excel program and create a new spreadsheet, (if one isn’t automatically created).
• Select cell A1 and then use the techniques learnt before and paste the data into cell A1.
• You will notice that Excel will copy and place the individual items into cells as per the table in the Word Document. You could now use the functions of the spreadsheet to calculate the totals, widen columns and so on.

• As an exercise, enter formulas into row 14 to add the total number of rabbits for each year.
• Save the Excel spreadsheet as Rabbits.xls on your hard drive.
Exercise 2
• Open the document and copy and paste the table from Word to Excel. Once you have pasted the data, enter formulas to calculate the closing value.
Exercise 3
• Using the Rabbits.doc file downloaded earlier, select the entries for the states and the 1996 figures (the first two columns).
• Copy and paste these into Excel.
Cutting and pasting data between applications
The procedure for cut and paste is exactly the same as copy and paste. Instead of selecting
You could also hold down the

Linked objects
• Open the document. There are two sheets in the workbook. One holds the data on the Rabbits and the other is a chart that graphs the rabbit populations for the years 1996 and 1997.
• Select the chart sheet by clicking the ‘Rabbit_Chart’ tab on the bottom left on the Spreadsheet screen. This should display the chart.
• Click the ‘chart area’. The chart area is the white area around the chart.
• When this is clicked you should notice small black squares (called handles) around the chart area. These indicate that you have selected the chart.
• Use the techniques learned before and copy the chart to the clipboard.
• Open Microsoft Word and check that you have an empty document.
• From the
• A dialog box will appear on the screen. Your computer system knows that the object in the clipboard is a chart object and presents this option to you. The other important point in here is the radio button to ‘Paste Link’.

• Ensure that you have selected both the ‘Paste Link’ option and also ‘Microsoft Excel Chart Object’ and click the
• This will paste the chart into the Word document. A link has been created back to the source document (Rabbits.xls).
Note that the chart shows NSW as having the most rabbits for the two years.
You will now prove that the link works.
• Return to Excel and select the
• Change the figure for the NSW rabbits for 1996 from 9 700 000 to 5 000 000. (Note that this will change other figures in the spreadsheet).
• Click on the
• Return to your Word document and check the chart within that document. It should now reflect the fact that the data has changed in the source document, the spreadsheet. If the chart within Word has not changed, right mouse click on the chart and select the option to ‘Update Now’.
Embedded objects
• Select the area of the spreadsheet from A3:F15, the area that holds the rabbit data.
• Use the techniques learned earlier to copy and paste the data into a new Word document. Ensure that you use ‘Paste Special’ and maintain a link between the two documents.
• Once the data has been pasted into the Word document, save it as rabbit.doc on your hard drive.
• Close both the rabbit spreadsheet and the Word document.
• Now re-open the rabbit document. The rabbit table should be inside the document.
• Double click the table in the Word document. This should open Excel and also open the Rabbits.xls spreadsheet.
• You could now make changes to the spreadsheet as required and the changes would be reflected back in the chart in the Word document.
• Create a chart based on the surplus/deficit figures for the three months.
• Export the chart to a Word document as a linked and embedded object.
• Save your Word document (you can think of a name).
• Close the spreadsheet and Word program.
• Open the Word program and double click on the chart to open the Excel program.
• If Excel doesn’t open, review the activities from this document to ensure that you can get OLE to work.
2. Using images in documents
3. Creating documents for use on web pages
• Portable and relatively cheap.
• Most computers have the ability to read and save to a floppy disk.
• Standard floppy disks have limited storage capacity – generally 1.44Mb, although there are some disks that can store 100Mb. Note that these require a special type of floppy disk drive.
• Slow to access and read/save data.
• High possibility of viral infection.
• High probability of losing stored data.
• Generally not portable but you can purchase removable hard drives.
• Not cheap, although the price of hard disk drives is continually falling.
• Capable of storing large amounts of data - tens of Gigabytes (Gb).
• Faster than other media for storage and retrieval of data.
• Prone to virus infection.
• Low to moderate probability of losing the data stored on the medium.
• Portable storage medium. Most computers sold these days have a CD-ROM (Compact Disk- Read Only Memory) capable of reading the CD disks.
• Come in various formats.
• Disks and the CD drives are relatively inexpensive.
• Some CDs can be used many times for storage of data. These are Compact Disk re-writable (CD-RW) disks.
• Some CDs can only be used once for storage of data but used many times for accessing the data. These were called recordable (CD-R) disks.
• Hold a limited amount of data, generally 800Mb - not as much as hard disks but considerably more than floppy disks.
• Popular in multimedia applications for storing music, video, and images.
• Low probability of losing stored data in the short term.
• Come in various formats.
• Currently capable of storing 4.7Gb of data
• Some DVDs used for Hollywood type movies are double layered. This allows the DVD to store the data twice.
• Quality of output of DVD movies is more than twice the quality of standard VHS tapes.
• Looks like a normal CD but a little more expensive as are the DVD reader/writers, although this may soon change.
• High speed access but not as quick as a hard disk drive.
• DVD medium is portable but your computer needs a DVD reader to access the data.
• Extremely popular for multimedia applications. Movies and sophisticated presentations can be created on a computer and played on a standard DVD desk top player on your television.
• Will last a long time, as there is no contact between the disk heads and the actual medium.
• Low probability of losing stored data in the short term.
• A newer popular type of portable storage media.
• Currently capable of storing up to 2Gb.
• Reasonably expensive, although this may soon change.
• Small and light. Can be carried in your pocket or on your keychain.
• Reasonably fast access.
• Computers need a USB port to access the drive, so they cannot be used on earlier computers without installing a USB peripheral card.
• Low to medium probability of losing stored data in the short term.
Go to activity
Using images in documents
Images can be obtained from various sources. Images may be:
• downloaded from a digital camera
• purchased on CD from various vendors
• downloaded from the Internet from sites that offer free images
• drawn in various drawing programs on a computer.
• Some applications will only save images as a certain type. Early versions of Windows Paint, would only save as a bitmap (.bmp), for example.
• The size of the image can vary considerably depending on how the image has been saved.
• Placement of the image within the document needs to be carefully considered and also how the text can flow with the image. Ask yourself if text should flow around the image, or stay only on the left or right of the image.
Activity 1 - Comparing image files

This is a 256 colour .gif image of approximately 14k.

This is a 16.7 million colour .jpeg image of approximately 9k.
• Right click on each smiley image above and save them to your hard disk. Do not change the name and file type.
• Download the image_exercise.doc (word document) and save it on your hard disk.
• Once you have downloaded the document, open it in Microsoft Word.
• The document has some information in it and also two tables. The tables will be used to place the graphics within the document.
• The second table also has some text in it so we can place the image amongst text to practice wrapping text around images and also resizing the images. (The text in the second box is actually two verses of our National Anthem!).
• Click behind the text ‘The gif image will be placed behind here’. This text is in the first table. See the image on the right.

• Select the
• Navigate to where you saved the two smiley face images.
• Select the Smiley_gif.gif image and click the

• The gif image will be inserted into the first table.
• Click on the image. The ‘handles’ (small boxes) will be placed around the image.
• Note that there is a small problem in that the text is pushed to the left and top and bottom of the document. It needs to be tidied up.

• Move the mouse cursor over the bottom right handle of the image. The shape of the cursor will change to an angled, two headed arrow.
• Once you have this shape, click and hold the left mouse button and drag up. This will allow you to resize and reduce the image.
• Reduce it down to around 50% of its original size.
• Click on the smiley image and hold down the left mouse button. You can now move the image left or right within the table.
• Drag the image across to the right of the existing text and let the mouse button go. The image will be placed at the end of the text.

In the above activity you learnt how to insert an image into your document and move it around the table to make placing the text easy. In the next part of the activity, you will learn how to place the image among existing text, and to get text to flow around the image.
• Ensure that the image_exercise.doc is open and click behind the red text in the second table.
• Select the
• Navigate to where you saved the two smiley face images.
• Select the Smiley_jpeg.jpg image and click the
• This will place the image in the table. Because of the size of the image, the document will probably now extend over two pages.
• Use the techniques you learned in the previous activity and resize the image to a more manageable size, so the table and the image fit on one page.

• Delete the red text in the second table. The image will move to the left, although there is still a gap between the first and second verse of the anthem. It would be better if the text flowed around the image, as shown in the graphic on the right.
• To do this we need to format the picture within Microsoft Word.

• Double click the image.
• This will open the ‘Format Picture’ dialog box.
• Select the Layout tab. This shows the various layouts the text can form around the image.

• Click the
• Ensure the ‘Text Wrapping’ tab is selected and click the picture named ‘Square’. This setting will allow you to move the image anywhere around your document without affecting the text.
• The images in this area show you how your text will flow around the image once selected.
• Click the

• You will notice that the handles (the small black boxes) around the image have changed to circles.
• You can now drag the image around the table amongst the text.
• When you place the image, the text will flow around it.
• Place the image in the top right of the table and notice how the text flows to the edge and underneath.
• Practice moving the image around the table and placing it in various positions.

Hints:
• The Microsoft Office program includes a set of images in the .wmf (Windows Metafile Format) format that can be used within your Word or Excel documents.
• When you are creating your images, ensure that the size of the files are not too large. When saving your documents it may make the files too large and they cannot be saved on floppy disks or used on web sites.
Exercise 2
• Try not to put too much in the picture because the file size may get too large.
• Save the image on your hard disk as a bitmap. If possible, use the option to save as a 24 bit colour bitmap to keep to a smaller size. This will depend on your version of Windows.
• Use the techniques learned above and import the image into a new Word document.
• Type some text in your document and manipulate the image so that the text flows around it.
As additional exercises do the following.
• Use the --------- option from the edit menu. This will place a copy of the image into the Windows Clipboard.
• Simply
• If your Paint program allows, save some images in different formats and compare the saved sizes between each format. If you have Windows XP, you can save in different formats.
• If you have access to other image programs on your computer such as Jasc Paint Shop Pro® or Adobe Photoshop®, create some images and save them from those programs.
Creating documents for use on web pages
• Static data means that the contents of the web page will not change every time a user accesses a page. The data only changes if somebody (or the application program) generates a new page using Excel or Access and saves it in HTML format.
• This file shows the number of viewers per 100 that watch specific television shows on various TV channels.
• Open the file in Microsoft Excel.
• Fix the spreadsheet so that the columns are the correct width, and it has some colour and formatting (we want it to look good if it’s to be placed on the web).
• Once you are happy with your formatting select the
• At the bottom of the
• Click the down arrow to the right of the file name. This will open a drop list from which you can select the option to save as different file types.
• Select the option for web page, (HTM or HTML)

• When you select the option to save as a HTML file, the layout of the save box will change.
• Leave the name of the file as Television.htm. As there is only one sheet in this workbook, leave the option to publish entire workbook selected.

• There may be an option on your screen to ‘Add interactivity’, (if you are using Office XP). Leave this option un-ticked. When selected, this would allow a user via the web, to manipulate the spreadsheet within a browser. Your web server must be capable of handling this complex interactivity.
• Ensure that the My Documents folder is selected as the place to save the file.
• Click the
• A second dialog box will appear. This box offers more options when publishing the web page, including interactivity and the ability to update the web page when the data in the source document changes. You must be publishing the document to an existing Intranet or Internet server to use this function.
• For now leave all options unchanged and click the

• This will create a document in HTML format that could be used on a web site.
• You can still look at the web page, if you have a web browser (such as Internet Explorer or Netscape Navigator) installed on your computer.
• Navigate to where you saved the television.htm file and double click the file. Your default web browser and also the document will open.
• Here is a link to a sample of what the television.htm (HTML document) file may look like.
Exercise 4
• Use the spreadsheet downloaded in earlier activities called home_budget.xls (Excel document) and practice exporting the spreadsheet to a web page.
Determine and use help
Help is accessed through online help and manuals
1. Using Help
2. Context sensitive help
3. Using the question mark icon
4. Using the built in help system
5. Searching Help
6. Using the Office Assistant
Using many computer application programs these days can lead to sheer frustration in trying to do even the simplest of tasks. There are many ways of working out how to complete a task. You could ask a friend, buy a textbook, search the internet or use the Help facilities built into the program.
These notes will concentrate on using the help facilities within the Microsoft Word program, although the concepts, tasks and ideas can be applied to just about any program available on a computer.
Using Help
Within Microsoft Word (and other application programs) there are different types of help:
• context sensitive help
• help where you can search for information on a particular subject
• the (some say dreaded) Office Assistant.
Context sensitive help
Most Windows programs provide the ability to get help on a particular part of the screen, function or task by accessing a facility called context sensitive help. In Microsoft Word (and most Windows programs) help can be accessed from the Help menu or by using a combination of keyboard keys.
Activity 1 - Use context sensitive help
• Open the Microsoft Word program and create a new document.
• Select the

• The shape of the pointer will change to a left pointing arrow with a question mark attached to it.
• The cursor will stay this shape until you click on something in the current window.
• Move the mouse pointer over the icon of the floppy disk on the toolbar menu.
• Click the left mouse button.
• Information on that particular item will appear in a balloon box on the screen.
• If you want help on another item, select the
On some items, there may be no information available on the item you select. In this case the help system will inform you that: ‘There is no help available for this subject’.

Exercise 1
• Use context sensitive help and click on different items in the Windows screen and get help on those items. For example, while in context sensitive help click the printer icon, the ABC icon etc.
Using the question mark icon

In some dialog screens, you may notice an icon of a question mark in the right hand top corner of the dialog box. This can also be used for context sensitive help on the dialog box currently showing.
Activity 2
• While in Microsoft Word, click
• This will open the ‘Save As’ dialog box.
• In the top right of the dialog box, you will notice an icon of a question mark.
• Move the cursor over the question mark and click the left mouse button.
• The cursor will change shape to the context sensitive help pointer.
• Move it over an item in the ‘Save As’ dialog box and click on it.
Help on the item will be displayed or you will get a message that no help topic is associated with the item.

Using the built in help system
Microsoft Word, like most programs, has built in help systems. You can access these systems by clicking on the
Help can then be accessed by clicking on different items within Help or searching for specific data.
Activity 3 – Using general help
Note: For this part of the activities it is important that the Office Assistant is not active. To ensure this, please complete the following steps.
• Click the
• Select
• Right click on the Office Assistant and select
• Select the
• The Office Assistant will close and the following activities will work correctly.
• Ensure that Microsoft Word is open with an empty document.
• Press the
• This will open the help system. Note that the help system is a separate process in later office applications. It will run a new application called the Microsoft Word Help Program.
• Click the
• The contents section allows you to navigate through the help system.
• To expand the help contents, click the small plus sign beside ‘Microsoft Word Help’.
• Notice beside each of the small icons of books, there are plus signs.
• Clicking on any of these plus signs will expand more help on that subject.
• Note that the wording and location of help between versions of Office differs. Below is one example that shows what happens when some of the items are expanded to navigate down to help on OLE (Object linking and embedding) within Word.
• As an activity, determine where help on OLE is within your help system. It may be the same as the image above or the wording and location could be a little different.
Searching Help
You need to know where to find help in the contents list to be able to get information.
However, a better option is to use the search system within help.
Activity 4 – Searching for Help
• Ensure that Microsoft Word Help is open.
• Click the ‘Answer Wizard’ tab. Note: on some Help systems this may be called ‘Search’.
• There is an input box in which you type the text that you would like to search for in the help system.

• For the exercise, we will do a search on OLE objects.
• If not already selected, click the text in the input box.
• Type in OLE.
• Click the
• The bottom area will then display a list of topics within Help that relates to our search criteria, OLE.
If you click on a topic, the right side of the Help screen will display information about the topic.
• In some Help screens you will notice that the information includes hyperlinks to more information.
• A hyperlink is simply a navigation link between this part of Help and another part of Help.
• If you click on the link it will display more help related to the search topic.
Exercise 3
• For this exercise, search for any help items that you may have had trouble with when using Word.
• If you can’t think of any, try searching on items such as:
1. importing
2. exporting
3. integration.
Note there is no answer for this exercise because of the differences between help systems.
Using the Office Assistant
The Office Assistant is a help feature integrated into recent versions of Microsoft Office. The Office Assistant is another way to access Help by typing in your query and searching the help system. Many computer users do not like the intrusive nature of the Office Assistant and it is regularly disabled.
Activity 5 – Using the Office Assistant
• Because we deactivated the Assistant in the previous activity, we need to turn this feature back on.
• Click the

• An animated image of the Office Assistant will appear somewhere on your desktop. The character may also be different to the one shown at right as they can be changed.
• Click the Office Assistant animation with the left mouse button.
• A balloon box will appear into which you can type your help query.
• For the exercise, type OLE in the search box.
• Another balloon will appear with topics from the help system about OLE items.
Select a topic that interests you and you will be hyperlinked to that topic within the normal help system.
• Note that Office Assistant remains active and allows you to select different topics or do another search for other help items.
Determine and use help
Internal organisation client documentation is obtained and used
1. Mail Merge documents
2. Importing data into a table in a database
3. The Mail Merge wizard
Commercial computing packages also include programs for the storage of data to produce documents such as customer lists, price lists, overdue accounts and so on. These storage programs are called databases. A database program has two parts. First there is the actual data that is stored in tables and second there is the database management system that is used to control access to and retrieval of data from the tables.
Mail Merge documents
The data that is stored in the tables can include basically anything that could be stored on paper lists, forms or cards. Because it is stored in electronic format, you can use tools in programs such as Microsoft Word, Access or Excel to extract the data and create other documents for use within the organisation.
One such procedure is to produce Word documents called Mail Merge letters. For example if you had table(s) in a database that contained information on your customers such as their name, address, and personal information you could use this information to send out a letter informing them of brand new product that you wish to advertise.
If you have the data already stored in your database, then you can simply use tools (within Excel and Word) to extract the required data, (name, address etc) and print the data (customer details) once on the top of a generic letter.
Remember, (for the exercise) that a database consists of tables. A table consists of different entries and is also sometimes called a file.
Within each table are fields which may contain information such as a person’s name, address, date of birth etc. Each form is a record of the person’s application and when you put all the forms together you have a file of member applications.

• The image above shows a table from a database.
• The table is a file of customers. The information could be written down on a customer card file.
• Each row represents a record on customers or the individual cards.
• Each record is broken into individual fields - ID, CustomerID, First Name etc.
• For each customer there must be exactly the same mount of fields, although the data in the fields can be the same or different.
Importing data into a table in a database
Activity 1 - Importing data into a database table
• First a database needs some valid records in it.
• Download the Customers.txt (Text document) file and store it in your My Documents folder.
• This text file is a delimited file that holds basic information on six customers. (Remember that a delimited file is a text file that holds data that is separated by a particular character.)
• You will use this text file to create a table in Microsoft Access that you can use in a Mail Merge letter.
Please note that these notes, activities and screen shots refer to using Office XP. However the concepts are the same for all versions of Microsoft Office.
• Open your Microsoft Access program and create a new empty database.
• Click

• Navigate to where you saved the customer.txt file in My Documents.
• Change the ‘Files of type’ option to display *.txt files.
• Select the customer.txt file and click 
• Your Access program should start to run an ‘Import Wizard’.
• The wizard will recognize that this is a text file and ask if it is a delimited or fixed width file.
• Notice how each entry in the Sample data box has quotes around it and there are commas between some of the words.
• When the data is imported, the entry will be stored in a separate field in the table, wherever there is a comma.
• Accept all the defaults in here and click 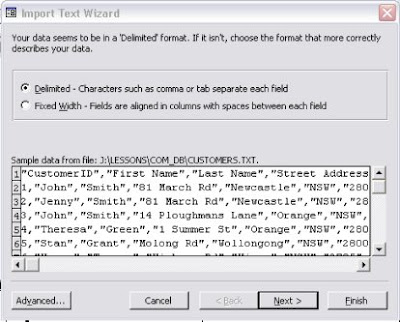
• The next screen gives you the option to change the delimiter character from something other than a comma.
• Make sure you pick the right delimiter character otherwise the data that is imported will be placed incorrectly into the table and the records will be invalid.
• For the exercise, leave the delimiter character as the comma.
• The other important item in this screen is the tick box for ‘First Row Contains Field Names’.
• Ensure that this option is selected. This tells the wizard that the very first row of information in the text document is used to identify the fields in the table.
• Click the 
• The next screen gives you the option to import the data into an existing table or create a new table.
• For the exercise you will create a new table.
• Leave all the options as they are and click 
• The next screen gives you an option to change the way your data is imported into the table.
• You could change the names of the fields or specify different formats for dates etc. If the data you were importing was stored in the American date format (MM/DD/YY), you could change this to display the Australian date format (DD/MM/YY).
• For the exercise, leave all options as they are and click 
• The next screen asks how to specify a ‘primary key’. A primary key is used to uniquely identify each person in the table. For example, each person in Australia has a unique Tax File Number that identifies that person. The primary key in the table uniquely identifies that customer.
• For the purposes of the exercise leave all the options as they are and click 
• The last screen simply asks for a name for your table.
• Leave it as the default of ‘Customer’ and click
• This will import the data into Microsoft Access, create a new table called ‘Customers’ and populate the table with data from the text file.
• You can now use this data for your Mail Merge.
• Save your database as ‘Customers’.
The Mail Merge wizard
Activity 2 – Doing a Mail Merge
You can now import the data into a generic letter that could be sent to customers.
• Again these instructions are for Office XP, but the same concepts can be applied to any version of Microsoft Office.
• Download the Merge_letter.doc (Word document) and save it on your hard drive.
• This is a sample document that a company could use to send to their customers about the opening of a new computer store.
• Open the merge_letter.doc.
• In Microsoft Word, select
• This will start the Mail Merge wizard.

• The screen will split into two sections - one showing the document and the other showing the wizard steps.
• The first question in the wizard is what type of document you are creating. Leave this at the default of letters.
• Notice also the option to continue to the next step at the bottom of the wizard screen.
• Click ‘Next: Starting Document’.
• This will move on to the next step.
• You will now be asked for the document to use for the Mail Merge. You can use the current document, load a new document or use a template document.
• For the exercise, leave it at ‘Use the current document’.
• Click the next step ‘Select Recipients’.
• The next step asks for a list of the recipients to include in your mail merge.
• You can use an existing list from a database, text document or spreadsheet, or create your own list.
• For the purposes of this exercise, you want to use the list (table), in the customer database.
• Note that you could also click ‘Browse’ here and navigate to the database. to perform the same operation as the next step.
• Leave the default option to ‘Use an existing list’ and click the next step ‘Write your letter’.
• The ‘Select Data Source’ navigation box will appear asking you to select the data source.
• Navigate to where you saved your customer database and click
• The ‘Mail Merge Recipients’ dialog box will appear. As the customer table is the only table in your database, it opens that table.
• Each record that has a tick beside it will be included and a letter will be generated for each customer.
To exclude a customer from the list, remove the tick beside their record.
• You could also sort the tables into different order. For example, if you wanted the letters printed in town order for delivery purposes, you could sort them by clicking the ‘City’ identifier. If you click the City identifier again, the table is sorted into reverse order.
• Click the
• Select the next step ‘Write your letter’.
• As the letter is already written, you do not need to add anything.
• However, you do need to place the fields that you have imported on the letter in their correct positions. This is the procedure ‘add recipient information’.
• Click in the document at the top and to the left, just below the graphic. This is where you will place the first field.
• It is easier to click where you want the fields to be placed before placing them, but they can be moved after if required. 
Select the ‘More Items’ hyperlink from the wizard.
• This will open the ‘Insert Merge Field’ dialog box.
• This dialog box shows the fields from the database table that can be inserted into the document.
• For the exercise, you do not need all the fields shown in here.
• Click on the first field, ‘First Name’, and click the
• The field is placed into the document.
• Repeat the previous two steps for each of the remaining fields for the merge document - ’Last Name’, ‘Street’, ‘Address’, ‘City’ and ‘Postcode’.
• This will place them all in one line (which you will fix in a moment). See the graphic below.

To tidy the layout of the document, click between each of the fields and either press the

• There is one more task to complete in this section.
• Use the technique just learned and insert the ‘First Name’ field after the word ‘Dear’.
• There is now enough information in the letter to continue. However you could continue to add fields to the letter if necessary.
• Select the next step ‘Preview the Letter’.

• This step will show how the first of your merge letters will look.
• If the layout is not to your liking, select the previous step and adjust the letter.
• Note that you also have the option to display a particular recipient’s details or to modify the list.
• Also, the documents will not print with the grey backgrounds around the field names.
• Select the next step: ‘Complete the merge’.

• In the last step you have the option to print all the documents or edit each document.
• For the exercise, don’t send them to the printer.
• Click the hyperlink to ‘Edit individual letters’.

• The ‘Merge to New Document’ box appears. This box allows you to create a new document with separate pages for each recipient, create a new document for the current recipient or pick a range of recipients.
• For this exercise, leave the ‘All’ option selected and click
• This should generate a new document called ‘Letters1’.
• The document should contain 6 separate pages, one for each recipient.
• Note that the content of each letter is the same, but the names and addresses have been inserted from the records in your database.

Exercise 1
• the database table to a Word document.
You will also create an image to place on the top of the document. An example of a finished document is supplied.
• Download the dogs.txt (Text document) file and save it on your hard drive.
• Download the dog_history.doc (Word document) file and save it on your hard disk.
• Download the finished.doc (Word document) file and save it on your hard disk.
• Import the dogs.txt file into Microsoft Access as a table called ‘Dogs’. Note that the first row contains field identifiers. Save your database as ‘Dogs’ too.
• Create an image using Windows Paint that could be used as a document header image for the Vet surgery.
• Save the image as a bitmap or as a jpeg file if you have the option.
• Open the Word document called dog_history.doc (downloaded earlier) and replace the first piece of red text with the image you created in the previous step.
• Insert the fields from the dog table into the Word document.
• Create a merge document for each of the dogs in the table.
Glossary
Microsoft Windows An operating system for your computer that controls resources such as file management, input and output, printing etc.
File extension A group of characters that an application will attach to a file to identify it to the operating system. Examples are .doc for Word documents, .xls for Excel documents.
Table A data structure used in databases to hold information in a complete entity such as customers, employees, spare parts, goods in stock etc.
Field The individual elements that make up a database record. For example, a customer record would hold individual elements on the customer name, address, city and postcode.
Record The individual items that make up a database table. Each customer would have a record in a customer table. The individual fields are combined to make a record.
Primary key A field in a database that uniquely identifies each record. For example, the Australian government keeps a record of each person in their tax file system. Each person is identified by a tax file number. This could be used as a primary key in a database table.
File This word is often used to describe a document.
Clipboard A temporary storage area of a computer’s memory to keep information for importing and exporting within documents and programs.
Filter An add-on feature to a computer program that can perform special functions such as allowing data to be imported/exported into another program. One example would be the filter that allows a Lotus123 spreadsheet file to be opened in Microsoft Excel.
Embedded object An object such as a chart, spreadsheet or document, that when placed in another type of application is embedded and linked.
HTML Hypertext mark-up language. The program code used in web pages to display text, images, colours, sound, video etc.
Lotus123® An alternative spreadsheet program to Microsoft Excel..
Compressed file A file where a special algorithm is used to extract certain data from within the file to make it smaller. When it is smaller it can be transferred more easily using floppy disks, CDs or even email. The file needs to be filled again before it can be used.
No comments:
Post a Comment